Before You Buy Anything: Critical First Steps
The biggest mistake new restoration business owners make is rushing to buy equipment before they’re ready to use it. Here’s what you actually need first:
1. Get Certified
Before spending a dollar on equipment, invest in your education:
- WRT (Water Restoration Technician) certification – 2-day course, approximately $500-600
- ASD (Applied Structural Drying) certification – includes hands-on training with a flood house, $1,000-1,500
These certifications teach you the science behind drying, proper equipment placement, documentation requirements, and industry standards (S500). Without this foundation, you’ll waste money on equipment you don’t know how to use effectively.
2. Invest in a Quality Moisture Meter
Your moisture meter is the single most important tool you’ll own. Recommended option:
- Tramex or Delmhorst pinless moisture meter ($550-700)
- Look for models that fit under toe kicks and in tight spaces
- Avoid bulky models that won’t reach behind door casings
Optional but valuable: FLIR thermal imaging camera ($500-1,500). The budget-friendly FLIR ONE attachment for iPhones works surprisingly well for beginners.
3. Secure Your First Jobs BEFORE Buying Equipment
This is controversial but critical: Don’t buy equipment until you’ve landed your first 2-3 jobs. Here’s why:
You can rent everything you need initially:
- Home Depot and Lowe’s rent air movers and dehumidifiers
- Local equipment rental companies (Sunbelt, United Rentals) stock restoration equipment
- Partner with carpet cleaners for extraction on your first jobs
- A shop vac handles small extraction jobs effectively
Generate cash flow first, then invest in equipment. One industry veteran shared: “I bought 20 fans and 5 dehumidifiers used on Facebook, got my first 3 jobs back-to-back, and the equipment paid for itself. Everything after that was profit.”
Quick Summary (2-3 Minute Read)
Starting a water restoration business doesn’t require a massive upfront investment in equipment, if you’re strategic. Here are the most valuable takeaways from industry veterans:
Start Smart, Not Heavy:
- Your first purchases should be certifications (WRT/ASD), a quality moisture meter ($500-700), and optionally a thermal imaging camera ($500-1500)
- Rent equipment for your first 3-5 jobs to generate cash flow before buying
- A shop vac and partnerships with carpet cleaners can handle extraction initially
Essential First Package (4:1 or 5:1 Ratio):
- 20-30 air movers (fans)
- 3-5 dehumidifiers (1 large 130-pint unit + 2 smaller 85-pint units)
- 1-2 HEPA air scrubbers (500 CFM)
- 1 moisture meter with thermal hygrometer
- Basic hand tools and PPE
Budget Tiers:
- Minimal Start: $3,000-5,000 (2 dehumidifiers, 10-20 air movers, rent the rest)
- Standard Package: $8,000-12,000 (3 dehumidifiers, 25 air movers, 1 air scrubber, moisture meter)
- Professional Setup: $15,000-20,000 (Full package including portable extractor and specialty equipment)
Pro Tips That Save Thousands:
- Buy used equipment strategically from Facebook Marketplace or failed restoration businesses
- Choose compact, stackable equipment (radial/pancake fans) over heavy axial fans
- Mid-roof Ford Transit vans are ideal, avoid high-tops that won’t fit drive-throughs
- Lower amperage fans (under 2 amps) prevent breaker issues on job sites
- Always turn on all equipment and wait 15 minutes to test for breaker trips
- Budget for shelving/organization ($2,000-3,000) to maximize van efficiency
What NOT to Do:
- Don’t buy equipment before securing your first jobs
- Avoid spending all capital on gear, save budget for marketing and leads
- Skip the cheap “baby fans” unless you’re using them strategically for stabilization
- Don’t buy Phoenix compact dehumidifiers (pumps fail frequently per multiple sources)
- Never start with massive box trucks, maneuverability matters
Now, let’s dive into the complete guide that will walk you through every decision, every budget scenario, and every piece of equipment you need to know about.
Understanding Equipment Ratios and Job Requirements
The restoration industry follows a standard drying ratio called 4:1 or 5:1:
- 4-5 air movers per 1 dehumidifier = 1 drying chamber
This ratio comes from IICRC standards and ensures proper air circulation and moisture removal. Most residential water losses require 1-2 drying chambers.
What’s a “Drying Chamber”?
A contained space where you’re actively drying materials. This could be:
- A single room
- A section of a basement
- A contained hallway and bedroom area
Standard residential job setup:
- Small job (bathroom): 1 drying chamber = 4-5 air movers + 1 dehumidifier
- Medium job (kitchen + hallway): 2 drying chambers = 10 air movers + 2 dehumidifiers
- Large job (finished basement): 3-4 drying chambers = 20 air movers + 4 dehumidifiers
Why This Matters for Your First Purchase
If you can set up equipment for 2 complete jobs without returning to your shop, you’ll be significantly more efficient. Industry recommendation: Start with enough equipment to handle 2 drying chambers.
The Three Types of Air Movers: Pros, Cons, and When to Use Each
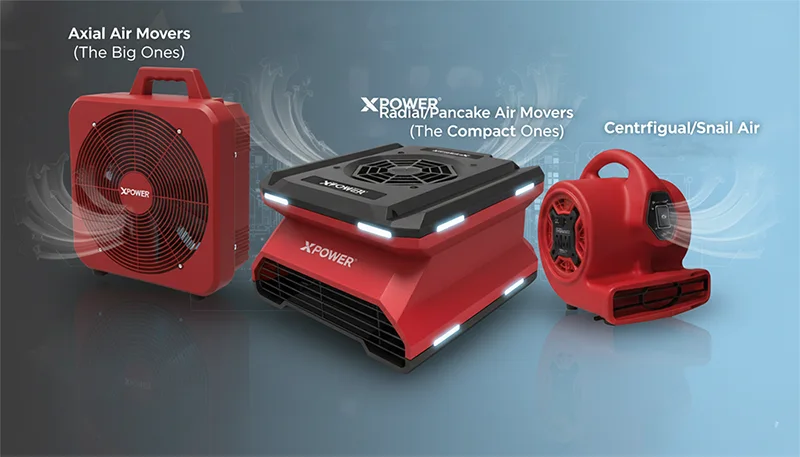
Air movers (never call them “fans”, we’re professionals) come in three main styles:
1. Axial Air Movers (The Big Ones)
What they look like: Large, rectangular units (think Gale Force brand)
Pros:
- Move massive amounts of air
- Excellent for large commercial jobs
- Higher billing rates in Xactimate
- Very powerful airflow
Cons:
- Heavy (30-35 lbs each)
- Don’t stack well in vans
- Can’t point straight up
- Use more electricity (2.5-3+ amps)
Best for: Commercial properties, large open spaces, or when you specifically need high-volume air movement.
Should you start with these? No. Unless you’re doing exclusively commercial work, these will sit in your warehouse. They’re too heavy and unwieldy for daily residential use.
2. Radial/Pancake Air Movers (The Compact Ones)
What they look like: Low-profile, stackable units (Phoenix Focus II, Dri-Eaz, AirMax)
Pros:
- Lightweight (18-22 lbs)
- Highly stackable, fit 16-20 in a van easily
- Low amperage (1.8-2 amps), fewer breaker issues
- Easy to carry (2 per hand through doorways)
- Affordable ($200-350 each)
Cons:
- Limited drying angles (flat or straight up only)
- Not ideal for large open commercial spaces
- Less versatile than centrifugal fans
Best for: 90% of residential water losses. These are your workhorses.
Should you start with these? Yes. Industry consensus: Buy 20-30 radial air movers for your first package.
3. Centrifugal/Snail Air Movers (The Versatile Ones)
What they look like: Round “snail shell” design (Omni Dry brand)
Pros:
- Affordable ($200-250 each)
- Extremely versatile angles (horizontal, 45°, vertical)
- Durable, proven design that’s been around for decades
- Good for angled drying situations
Cons:
- Heavy (25-30 lbs)
- Don’t stack as efficiently
- Take up more van space
- Higher amperage draw
Best for: Situations requiring angled drying, wall cavities, or when you need versatility.
Should you start with these? Only if budget is your primary concern. They’re affordable but harder on your crew.
Pro Tip: The “Baby Fans”
Small, consumer-grade fans ($50-100 each) have a place in your arsenal, but not for drying. Use them for:
- Job stabilization when you need to “spike” a job quickly with minimal equipment
- Show of force while you mobilize larger equipment
- Tight spaces like cabinets or closets where full-size fans won’t fit
Keep 5-8 of these on hand, but never rely on them as primary drying equipment.
Dehumidifiers: Size, Capacity, and Brand Recommendations {#dehumidifiers}
Dehumidifiers are rated by pints per day (PPD) of water removal under specific conditions (80°F, 60% RH).
Size Categories
Large Capacity (130-150 PPD)
- Examples: Phoenix DryMax XL, Dri-Eaz LGR 7000
- Use for: Primary dehumidification, large rooms, commercial jobs
- Cost: $2,500-3,500 new
Mid Capacity (85-100 PPD)
- Examples: Phoenix DryMax BLE, Dri-Eaz Revolution LGR
- Use for: Secondary drying chambers, residential jobs
- Cost: $1,500-2,000 new
Crawlspace/Compact (50-70 PPD)
- Use for: Small spaces, crawlspaces, closets
- Cost: $800-1,200 new
Your First 3 Dehumidifiers: The Proven Formula
Industry veterans consistently recommend this setup:
- One large capacity unit (130+ PPD) – This is your workhorse
- Two mid-capacity units (85-100 PPD) – More affordable, still effective
This gives you flexibility to:
- Handle 2-3 drying chambers simultaneously
- Mix and match based on job size
- Have backup if one unit fails
Brand Warning: What NOT to Buy
Avoid Phoenix compact dehumidifiers with built-in pumps. Multiple industry sources report consistent pump failures. One restoration owner stated: “I spent $30,000 on Phoenix compact dehumidifiers and every single one had pump failures within a year. Phoenix refused to make it right.”
Recommended brands:
- Dri-Eaz: Reliable, excellent customer service, proven track record
- Phoenix: Good fans, but avoid their compact dehumidifier line
- ASD Products: Emerging brand with solid reviews and better pricing
Features That Matter
- Auto pump-out: Essential. Allows continuous operation without manual emptying
- Built-in pump: Controversial, adds convenience but is a failure point
- Durable housing: Expect these to get knocked around
- Wheels/handles: Your crew will appreciate mobility
Essential Extraction Equipment: Portable vs. Truck Mount {#extraction}
Extraction removes standing water before drying begins. You have three options:
Option 1: Shop Vac + Carpet Cleaner Partnership (Beginner)
Cost: $200-400 for a quality shop vac
For your first 5-10 jobs:
- Use a commercial shop vac for small volumes of water
- Partner with local carpet cleaners for truck mount extraction (pay them per job)
- This keeps your initial investment under $500
When this works: Small residential losses (under 50 gallons of standing water)
Option 2: Portable Extractor
Cost: $3,000-6,000 new, $1,500-3,000 used
Recommended models:
- Dri-Eaz HVE3000
- Nautilus (combo extraction + carpet cleaning)
- Any unit with auto pump-out capability
Pros:
- Fits in any van
- Dual-purpose (extraction + carpet cleaning side business)
- Auto pump-out eliminates manual tank dumping
- Portable to upper floors
Cons:
- Slower than truck mounts
- Manual labor intensive
- Requires inline filters to catch debris
When to buy: After your first 5-10 jobs, when you have consistent work
Option 3: Truck Mount Extractor
Cost: $15,000-30,000+ installed
Pros:
- Fastest extraction method
- More powerful suction
- Professional appearance
- Can run multiple wands simultaneously on large jobs
Cons:
- Requires dedicated vehicle
- Expensive upfront cost
- Professional installation required ($2,000-4,000)
- Not portable to upper floors
When to buy: When you’re consistently running 8+ jobs per month and extraction is a bottleneck
Don’t Forget: Sump Pumps
Keep a 1-2 HP sump pump in your van ($150-300). For crawlspaces or basements with feet of standing water, sump pumps are faster and more efficient than any extractor.
Pro tip: One restoration company billed an insurance company by the gallon for crawlspace water removal and made $30,000 on a single extraction job.
Air Scrubbers, Moisture Meters, and Specialty Tools {#specialty-tools}
HEPA Air Scrubbers (Air Filtration Devices)
Purpose: Filter airborne particles during demolition, mold remediation, or category 3 water losses
Recommended specs:
- 500 CFM (cubic feet per minute) for residential
- HEPA filtration (captures 99.97% of particles 0.3 microns or larger)
- Multiple speed settings
How many you need:
- Start with 1-2 units
- Use on every job, even category 1 water, it’s professional and improves air quality
Cost: $800-1,200 each new
Note: Always use air scrubbers on any demolition work, regardless of water category. Insurance companies accept this as standard protocol.
Moisture Meters: Your Most Important Tool
You’ll use this on every single job, so invest in quality:
Essential features:
- Pinless moisture reading (non-invasive)
- Built-in thermal hygrometer (temp + humidity)
- Slim profile (fits under toe kicks)
Recommended models:
- Tramex MRH III ($600-700)
- FLIR MR277 ($800-900) – includes infrared camera
- Delmhorst BD-10 ($550-650)
Why thermal matters: Evaporation is a cooling process. Wet materials show up as cold spots on thermal imaging, guiding you to hidden moisture.
Specialty Drying Equipment
Injectidry System (Wall Cavity Drying)
- Cost: $4,000-5,000 for base unit + mats
- Use: Dry inside wall cavities without removing drywall
- When to buy: After your first 20-30 jobs
Water Claw (Weighted Extraction)
- Cost: $300-500
- Use: Extract water from carpet pad without removing carpet
- Insurance pays 2x more for weighted extraction vs. standard wand
- Buy early, it pays for itself in 2-3 jobs
Essential Hand Tools
Budget $500-1,000 for:
- Sawzall (reciprocating saw)
- Oscillating multi-tool (for precise cuts at corners)
- Drills (impact driver + standard drill)
- Hammers, pry bars, screwdrivers
- Moisture meter probes (pins for invasive testing)
PPE (Personal Protective Equipment)
Don’t skip this. Budget $200-400 per technician:
- N95 or P100 respirators with cartridges
- Tyvek suits (box of 25)
- Nitrile gloves (multiple sizes)
- Safety glasses
- Knee pads (you’ll thank me)
Vehicle Selection: Vans, Trucks, and Storage Solutions {#vehicles}
Your vehicle is a rolling billboard and mobile warehouse. Choose wisely.
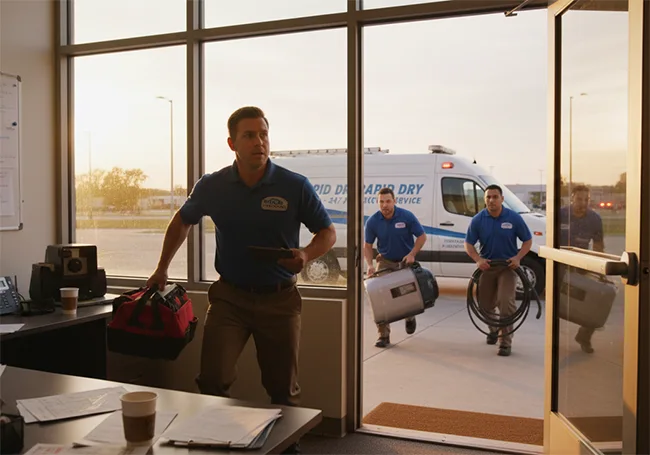
The Winner: Ford Transit Mid-Roof (Extended)
Why it’s ideal:
- Fits 20-30 air movers + 4 dehumidifiers + air scrubbers + extraction equipment
- Can set 2 complete jobs without returning to shop
- Fits through drive-throughs (high-tops don’t, your crew will rip the roof off at Wendy’s)
- Parks in standard parking spots
- Holds 6’+ ladders diagonally
Alternatives:
- Mercedes Sprinter (more expensive, similar capacity)
- Dodge ProMaster (cheaper, slightly less reliable)
- RAM ProMaster (good mid-range option)
Avoid:
- High-top vans (drive-through clearance issues)
- Small box trucks (hard to maneuver in driveways)
- Pickup trucks in cold climates (equipment freezes)
Van Organization: Critical for Efficiency
Budget $2,000-3,000 for professional shelving:
- Adrian Steel shelving (industry standard)
- Weather Guard (heavy-duty alternative)
Organization tips:
- Dehumidifiers on floor mounts with drain trays underneath
- Air movers stack on 2-foot-wide shelves (stack 4-6 high)
- Consumables (plastic, tape, garbage bags) on upper shelves
- Tools in locking cabinets or tool bags
- Moisture meter in easily accessible spot
Pro tip: Your van layout should allow one person to load/unload equipment efficiently. Test this before finalizing your setup.
Budget-Based Equipment Packages {#budget-packages}
Bare Minimum Package: $3,000-5,000
For: New businesses testing the waters, side hustlers
Equipment:
- 10-15 air movers (used) – $1,500-2,000
- 2 dehumidifiers (used) – $1,500-2,500
- 1 moisture meter – $600
- Shop vac – $200
- Basic hand tools – $300
- PPE – $200
Strategy:
- Rent additional equipment as needed
- Partner with carpet cleaners for extraction
- Buy used equipment from Facebook Marketplace or failed restoration businesses
- Accept smaller jobs only (1-2 room residential losses)
Limitations: Can handle 1 drying chamber at a time. Requires renting for anything larger.
Standard Starter Package: $8,000-12,000
For: Serious business launches, former contractors entering restoration
Equipment:
- 25-30 air movers (new) – $5,000-7,000
- 3 dehumidifiers (1 large + 2 mid-size) – $4,500-6,000
- 1-2 HEPA air scrubbers – $1,000-2,000
- Moisture meter with thermal – $700-900
- Portable extractor – $3,000-4,000 (buy after first 5 jobs)
- Hand tools + PPE – $800
Strategy:
- Finance through equipment supplier (many offer 12-36 month terms)
- Buy new equipment with warranties
- Can handle 2-3 drying chambers simultaneously
- Set up 2 full jobs without returning to shop
Capabilities: Handle 90% of residential water losses independently
Professional Package: $15,000-25,000
For: Former franchise owners, experienced contractors, well-capitalized startups
Equipment:
- 40-60 air movers (mix of radial + specialty) – $8,000-12,000
- 5-6 dehumidifiers (2 large + 3-4 mid-size) – $8,000-12,000
- 3 HEPA air scrubbers – $2,400-3,000
- Moisture meter with thermal – $900
- Portable extractor + wand kit – $4,500
- Injectidry system – $4,500
- Water Claw – $400
- Professional hand tools – $1,500
- Van shelving/organization – $2,500
Strategy:
- Buy mostly new equipment
- Mix 1-2 used dehumidifiers to save $2,000-3,000
- Establish equipment replacement fund (set aside $500/month)
- Can handle 4-6 drying chambers simultaneously
Capabilities: Handle residential + light commercial. Run 2-3 jobs concurrently.
Buying New vs. Used: Strategic Equipment Acquisition {#buying-strategy}
When to Buy New
Equipment to buy new:
- Moisture meters (accuracy is critical)
- Air scrubbers (HEPA filters are expensive to replace on old units)
- Your first portable extractor (reliability matters)
Benefits of buying new:
- Manufacturer warranties (typically 1-3 years)
- Financing options through suppliers
- Latest energy-efficient models (lower operating costs)
- Professional appearance for clients
Financing tip: Many restoration equipment suppliers (Jon-Don, Interlink, Ramsco) offer financing with terms from 12-60 months. This preserves cash for marketing.
When to Buy Used
Best used equipment purchases:
- Air movers (simple motors, hard to break)
- Dehumidifiers (if under 3 years old and well-maintained)
- Specialty equipment you’ll use occasionally
Where to find quality used equipment:
- Facebook Marketplace – Search “[your city] restoration equipment”
- Failed restoration businesses – Look for liquidation sales
- Equipment rental companies – They rotate stock annually
- Craigslist – Requires patience but gems exist
- Industry Facebook groups – People sell equipment constantly
What to inspect before buying used:
- Run the equipment for 30+ minutes
- Check for unusual noises or smells
- Verify all safety features work
- Test auto pump-out on dehumidifiers
- Check amperage draw matches specifications
- Confirm no cracks in housing or loose parts
Red flags:
- “Needs minor repair” = avoid
- Musty smell = water damage to internals
- Seller can’t demonstrate it working = broken
- Significantly below market value = stolen or broken
The Hybrid Strategy (Most Popular)
Smart restoration owners do this:
- Buy 60% of equipment used (air movers, 1-2 dehumidifiers)
- Buy 40% new (moisture meter, 1 dehumidifier, air scrubbers)
- Finance new equipment to preserve cash
- Rent specialty equipment until you need it 3+ times/month
Real example: “I bought 20 fans and 5 dehumidifiers used from Facebook for $4,000. Bought a new moisture meter for $600. Rented an extractor for my first 5 jobs. After job 5, I bought a new portable extractor with my profits.”
Renting Equipment: When and How {#renting}
Renting equipment is not a sign of weakness, it’s smart business during certain phases.
When Renting Makes Sense
Phase 1: First 5-10 Jobs Rent everything except your moisture meter. Generate cash flow before committing capital.
Phase 2: Specialty Equipment Rent injectidry systems, truck mount extractors, or commercial-size dehumidifiers until you need them monthly.
Phase 3: Overflow/Large Jobs Even established companies rent additional equipment for jobs that exceed their inventory.
Where to Rent Restoration Equipment
National Chains:
- Home Depot/Lowe’s (limited selection, convenient)
- Sunbelt Rentals (better selection)
- United Rentals (commercial focus)
Local Options:
- Independent equipment rental companies
- Restoration equipment suppliers (Jon-Don often rents)
- Carpet cleaning businesses (for extraction)
Restoration-Specific Rentals:
- Fellow restoration companies with excess inventory
- Franchise operations (some rent to independents)
- Equipment distributors (Interlink, Ramsco)
Rental Cost Guidelines
- Air mover: $10-20/day
- Dehumidifier: $25-50/day
- Air scrubber: $30-40/day
- Portable extractor: $75-150/day
Math check: If you rent a full package (20 fans + 3 dehumidifiers + air scrubber) at $500/day for a 4-day job, you’ll spend $2,000. Do this twice and you’ve spent $4,000, enough to buy used equipment.
The Break-Even Point
Most equipment pays for itself in 3-5 jobs if you’re billing properly. Rent for your first few jobs, then buy.
Equipment Maintenance and Inventory Management {#maintenance}
Daily Checks (Your Technicians Should Do This)
- Inspect power cords for fraying
- Check air mover grills for obstructions
- Verify dehumidifier pumps are working
- Empty inline filters on extractors
- Wipe down equipment exteriors (professionalism matters)
After Every Job
- Clean inline filters thoroughly
- Empty and rinse dehumidifier tanks
- Inspect equipment for damage
- Charge any battery-powered tools
- Restock consumables (plastic, tape, filters)
Monthly Maintenance
- Test all equipment for 30 minutes under load
- Replace worn power cords immediately
- Clean or replace dehumidifier filters
- Calibrate moisture meters (send to manufacturer annually)
- Inventory consumables and reorder
Inventory Tracking System
Use a simple system to prevent loss:
- Number every piece of equipment (use label maker)
- Take photos when equipment is placed
- Document which tech has which equipment
- Require sign-out/sign-in for equipment leaving the shop
Pro tip: Equipment gets lost constantly. Build a 10% annual replacement budget for “shrinkage.”
Final Thoughts: Equipment Is Not Your Biggest Challenge
If you made it this far, you understand that starting a water restoration business doesn’t require $50,000 in equipment. You can start for under $5,000 if you’re smart about renting, buying used, and focusing on cash flow.
But here’s the truth no one tells beginners: equipment is the easy part.
The real challenge is getting your phone to ring. You can have $20,000 in pristine equipment sitting in your garage, but if you don’t know how to generate leads, land jobs, and convert estimates into signed contracts, that equipment is worthless.
That’s why the smartest restoration owners invest in marketing BEFORE they invest in equipment. They spend money on Google Ads, Google Local Service Ads, building relationships with plumbers and insurance agents, and creating systems that generate consistent leads.
Only after they’ve proven they can consistently land 2-3 jobs per week do they invest heavily in equipment. And when they do buy equipment, they do it strategically, used where it makes sense, new where reliability matters, and financed to preserve cash for continued marketing.
Your first $5,000 should break down like this:
- $1,500 – Certifications (WRT/ASD)
- $600 – Moisture meter
- $1,500 – Marketing (Google Ads, Local Services, networking budget)
- $1,400 – Basic equipment rental budget for first 3-5 jobs
After you’ve landed those first jobs and generated $10,000-20,000 in revenue, then invest in equipment. Start with 20 radial air movers and 3 dehumidifiers (1 large, 2 mid-size). Buy used where possible, new where reliability matters, and rent specialty equipment until you need it monthly.
Remember: a $500 moisture meter and $2,000 in marketing will generate more revenue than $15,000 in equipment sitting idle. Build your business around getting jobs first, then scale your equipment to match your proven demand, not your ambition.
Grow Responsibly: Scale With Proof, Not Emotion
The temptation to “look” like a big operation is strong. Every new owner wants to walk into their warehouse and see rows of shiny blue dehumidifiers lined up like soldiers. But the veterans will tell you: that’s vanity, not value.
Your equipment inventory should grow only in response to consistent job flow.
If you’re consistently booking:
- 1–2 jobs per week → you need enough gear for 2 drying chambers.
- 3–4 jobs per week → scale to handle 4–5 chambers.
- 5+ jobs per week → begin building a second setup and vehicle.
Anything beyond that before you have the leads is dead capital.
The Rule of 3’s
Before every purchase, ask:
- Do I already rent this piece three or more times a month?
- Does it directly increase my billable line items in Xactimate?
- Will it pay itself off within three jobs?
If you can’t answer yes to at least two of those, you’re not ready to own it yet.
Prioritize Systems Over Stuff
Once you’ve got the core setup, the next level of “equipment” is actually invisible—your processes, tracking, and efficiency systems.
Invest in:
- Moisture documentation software (Encircle, MICA, or DryLink)
- Equipment tagging & tracking (QR codes or barcodes with check-in/out)
- Automated job folders (Google Drive or JobNimbus templates)
- Van organization & shelving systems (Adrian Steel or Weather Guard)
These don’t look as cool as a new air mover, but they’ll make you 10× faster, reduce equipment loss, and impress insurance adjusters with your professionalism.
Where to Go From Here
By now, you should know exactly what to buy, when to rent, and what to avoid. The roadmap is simple but powerful:
- Certify first – build credibility and competence.
- Rent smart – get paid before you pay out.
- Invest strategically – buy gear that proves its ROI.
- Systemize early – track every tool and job.
- Market relentlessly – no leads = no business, no matter the gear.
When you follow that order, your growth compounds naturally.
You’ll never be the guy with $20,000 of equipment and zero calls. You’ll be the one with $10,000 in booked jobs and the flexibility to rent or buy exactly what you need next week.
Your equipment shows what you do.
Your Restoration Expertise Badge shows why clients should trust you.
Join a verified network of restoration professionals who stand out with credibility, clean branding, and websites that convert.
Frequently Asked Questions (FAQ)
Yes, if you’re strategic. Your first $2,000 should go toward certifications ($1,500) and a moisture meter ($600). Rent equipment for your first 3-5 jobs from Home Depot or local rental companies ($300-500 per job). Use a shop vac for extraction and partner with carpet cleaners for larger volumes.
After generating $5,000-10,000 in revenue from those first jobs, invest in used air movers (10-20 units) and 2 dehumidifiers from Facebook Marketplace or Craigslist. This minimizes risk while you learn the business. The key is securing jobs BEFORE buying equipment, focus your remaining budget on lead generation (Google Ads, Google Local Services, plumber partnerships).
Buying too much equipment before landing jobs. Industry veterans consistently warn against spending $15,000-20,000 on equipment, then having it sit in storage because you haven’t figured out marketing yet.
The second biggest mistake is choosing the wrong equipment. Heavy axial air movers seem professional but will sit unused because they’re too cumbersome for daily residential work. Compact Phoenix dehumidifiers with pumps fail constantly despite being expensive. And high-top vans seem spacious until your technician rips the roof off in a drive-through.
Start minimal, rent when possible, and only buy equipment after you’ve proven you can consistently get jobs. Your money is better spent on marketing until you have steady work.
Start with off-brand air movers but invest in quality dehumidifiers and moisture meters. Here’s why:
Air movers are simple, they’re essentially motors with fans. Off-brand radial air movers (B-Air, AirMax, ASD Products) work perfectly fine and cost $150-250 vs. $300-350 for Phoenix. They’ll break eventually regardless of brand, so save the money.
Dehumidifiers are complex machines with compressors, pumps, and refrigerant systems. Cheap units fail constantly and will leave you stranded mid-job. Spend the extra $500 per unit for Dri-Eaz or Phoenix 200-series (avoid Phoenix compact units). The warranty and reliability are worth it.
Moisture meters must be accurate, inaccurate readings can lead to mold claims. Buy new from trusted brands (Tramex, Delmhorst, FLIR). This is not the place to save $200.
When you’re consistently running 8-10 jobs per month and extraction is taking more than 2 hours per job. Here are the indicators:
You’re paying technicians overtime because extraction is slow
You’re turning down large jobs due to extraction limitations
You’re renting truck mount extraction 3+ times per month
Your average job size is over $8,000 (indicating larger losses requiring more extraction)
You have a dedicated extraction technician or extraction specialty service
Truck mounts cost $15,000-30,000 plus installation, so they need to pay for themselves. At an average of $500 additional revenue per job from faster extraction, you need 40-60 jobs to break even. That’s 4-5 months at 10 jobs/month.
Don’t buy a truck mount in your first year. Portable extractors handle 95% of residential losses effectively and cost 75% less.
Proper van shelving and organization systems. Everyone focuses on air movers and dehumidifiers, but ignoring your vehicle setup costs you hours of productivity every single week.
Without proper shelving:
Equipment shifts during transport and gets damaged
Technicians waste 15-20 minutes loading/unloading per job
You can’t fit enough equipment (making 2-job setups impossible)
Equipment gets lost or forgotten
Your van looks unprofessional to clients
Budget $2,000-3,000 for professional Adrian Steel or Weather Guard shelving. Install drain trays under dehumidifiers, secure all equipment, and create designated spots for everything. This investment pays for itself in saved time within 60 days.
The second most overlooked item: inline filters for extractors. A $40 filter saves you from disassembling your $4,000 extractor to remove debris from the pump every other job. Always run extraction through an inline filter, your future self will thank you.